Must Watch!
華為 tit al00 刷機
华为TIT-AL00官方固件刷机教程_线刷|救砖教程图解
root-huawei-y6-pro
How to root Huawei Y6 PRO TIT-AL00.

Prerequisites:
Huawei Y6 pro (TIT-AL00)
ADB drivers (link: https://drive.google.com/file/d/0BzF...w?usp=sharingg)
ADB / Fastboot software (link: https://drive.google.com/file/d/0BzF...ew?usp=sharing)
CWM Recovery file (link: https://drive.google.com/file/d/0BzF...ew?usp=sharing )
PreRoot Stock Rom put sd card (link: https://drive.google.com/file/d/0BzF...ew?usp=sharing

Steps to complete:
1. Install ADB Drivers


總是內存不足
總是內存不足
手機有空間卻提醒內存不足
手機空間不足正確清理法

對於一些安卓手機自帶系統軟件,自己不能關閉【自動開機】,這時候就需要靠刷機(root)來解決。

清除DALVIK緩存
如果方法不管用,99%是Dalvik緩存惹的禍。
Dalvik緩存是啥呢?
Dalvik緩存,簡單說就是系統里普通刪除,去不掉的緩存垃圾。
我們在反覆安裝、卸載軟件時,會產生緩存,這些文件查看不到,而且並不會隨着軟件的卸載一起被清除,還會自動後台運行。
日積月累,這樣手機有限的內存慢慢被無形地佔用,越來越慢,甚至不夠用。

這時候就要用到【RE管理器】,不過前提是手機必須刷機(Root)。

Android Input events overview
Android Input events overview

On Android, there's more than one way to intercept the events from a user's interaction with your application.
When considering events within your user interface, the approach is to capture the events from the specific View object that the user interacts with.
The View class provides the means to do so.

Within the various View classes that you'll use to compose your layout, you may notice several public callback methods that look useful for UI events.
These methods are called by the Android framework when the respective action occurs on that object.
For instance, when a View (such as a Button) is touched, the onTouchEvent() method is called on that object.
However, in order to intercept this, you must extend the class and override the method.
However, extending every View object in order to handle such an event would not be practical.
This is why the View class also contains a collection of nested interfaces with callbacks that you can much more easily define.
These interfaces, called event listeners, are your ticket to capturing the user interaction with your UI.

While you will more commonly use the event listeners to listen for user interaction, there may come a time when you do want to extend a View class, in order to build a custom component.
Perhaps you want to extend the Button class to make something more fancy.
In this case, you'll be able to define the default event behaviors for your class using the class event handlers.

Event listeners
An event listener is an interface in the View class that contains a single callback method.
These methods will be called by the Android framework when the View to which the listener has been registered is triggered by user interaction with the item in the UI.

Included in the event listener interfaces are the following callback methods:

onClick()
From View.OnClickListener.
This is called when the user either touches the item (when in touch mode), or focuses upon the item with the navigation-keys or trackball and presses the suitable "enter" key or presses down on the trackball.

onLongClick()
From View.OnLongClickListener.
This is called when the user either touches and holds the item (when in touch mode), or focuses upon the item with the navigation-keys or trackball and presses and holds the suitable "enter" key or presses and holds down on the trackball (for one second).

onFocusChange()
From View.OnFocusChangeListener.
This is called when the user navigates onto or away from the item, using the navigation-keys or trackball.

onKey()
From View.OnKeyListener.
This is called when the user is focused on the item and presses or releases a hardware key on the device.

onTouch()
From View.OnTouchListener.
This is called when the user performs an action qualified as a touch event, including a press, a release, or any movement gesture on the screen (within the bounds of the item).

onCreateContextMenu()
From View.OnCreateContextMenuListener.
This is called when a Context Menu is being built (as the result of a sustained "long click").
See the discussion on context menus in the Menus developer guide.
These methods are the sole inhabitants of their respective interface.
To define one of these methods and handle your events, implement the nested interface in your Activity or define it as an anonymous class.
Then, pass an instance of your implementation to the respective View.set...Listener() method.
(E.g., call setOnClickListener() and pass it your implementation of the OnClickListener.)

The example below shows how to register an on-click listener for a Button.

KOTLIN
JAVA
protected void onCreate(savedValues: Bundle) {
    ...
    val button: Button = findViewById(R.id.corky)
    // Register the onClick listener with the implementation above
    button.setOnClickListener { view ->
        // do something when the button is clicked
    }
    ...
}

You may also find it more convenient to implement OnClickListener as a part of your Activity.
This will avoid the extra class load and object allocation.
For example:

KOTLIN
JAVA
class ExampleActivity : Activity(), OnClickListener {

    protected fun onCreate(savedValues: Bundle) {
        val button: Button = findViewById(R.id.corky)
        button.setOnClickListener(this)
    }

    // Implement the OnClickListener callback
    fun onClick(v: View) {
        // do something when the button is clicked
    }
}

Notice that the onClick() callback in the above example has no return value, but some other event listener methods must return a boolean.
The reason depends on the event.
For the few that do, here's why:

onLongClick() - This returns a boolean to indicate whether you have consumed the event and it should not be carried further.
That is, return true to indicate that you have handled the event and it should stop here; return false if you have not handled it and/or the event should continue to any other on-click listeners.

onKey() - This returns a boolean to indicate whether you have consumed the event and it should not be carried further.
That is, return true to indicate that you have handled the event and it should stop here; return false if you have not handled it and/or the event should continue to any other on-key listeners.

onTouch() - This returns a boolean to indicate whether your listener consumes this event.
The important thing is that this event can have multiple actions that follow each other.
So, if you return false when the down action event is received, you indicate that you have not consumed the event and are also not interested in subsequent actions from this event.
Thus, you will not be called for any other actions within the event, such as a finger gesture, or the eventual up action event.
Remember that hardware key events are always delivered to the View currently in focus.
They are dispatched starting from the top of the View hierarchy, and then down, until they reach the appropriate destination.
If your View (or a child of your View) currently has focus, then you can see the event travel through the dispatchKeyEvent() method.
As an alternative to capturing key events through your View, you can also receive all of the events inside your Activity with onKeyDown() and onKeyUp().

Also, when thinking about text input for your application, remember that many devices only have software input methods.
Such methods are not required to be key-based; some may use voice input, handwriting, and so on.
Even if an input method presents a keyboard-like interface, it will generally not trigger the onKeyDown() family of events.
You should never build a UI that requires specific key presses to be controlled unless you want to limit your application to devices with a hardware keyboard.
In particular, do not rely on these methods to validate input when the user presses the return key; instead, use actions like IME_ACTION_DONE to signal the input method how your application expects to react, so it may change its UI in a meaningful way.
Avoid assumptions about how a software input method should work and just trust it to supply already formatted text to your application.

Note: Android will call event handlers first and then the appropriate default handlers from the class definition second.
As such, returning true from these event listeners will stop the propagation of the event to other event listeners and will also block the callback to the default event handler in the View.
So be certain that you want to terminate the event when you return true.

Event handlers
If you're building a custom component from View, then you'll be able to define several callback methods used as default event handlers.
In the document about Custom View Components, you'll learn some of the common callbacks used for event handling, including:

onKeyDown(int, KeyEvent) - Called when a new key event occurs.
onKeyUp(int, KeyEvent) - Called when a key up event occurs.
onTrackballEvent(MotionEvent) - Called when a trackball motion event occurs.
onTouchEvent(MotionEvent) - Called when a touch screen motion event occurs.
onFocusChanged(boolean, int, Rect) - Called when the view gains or loses focus.
There are some other methods that you should be aware of, which are not part of the View class, but can directly impact the way you're able to handle events.
So, when managing more complex events inside a layout, consider these other methods:

Activity.dispatchTouchEvent(MotionEvent) - This allows your Activity to intercept all touch events before they are dispatched to the window.
ViewGroup.onInterceptTouchEvent(MotionEvent) - This allows a ViewGroup to watch events as they are dispatched to child Views.
ViewParent.requestDisallowInterceptTouchEvent(boolean) - Call this upon a parent View to indicate that it should not intercept touch events with onInterceptTouchEvent(MotionEvent).
Touch mode
When a user is navigating a user interface with directional keys or a trackball, it is necessary to give focus to actionable items (like buttons) so the user can see what will accept input.
If the device has touch capabilities, however, and the user begins interacting with the interface by touching it, then it is no longer necessary to highlight items, or give focus to a particular View.
Thus, there is a mode for interaction named "touch mode."

For a touch-capable device, once the user touches the screen, the device will enter touch mode.
From this point onward, only Views for which isFocusableInTouchMode() is true will be focusable, such as text editing widgets.
Other Views that are touchable, like buttons, will not take focus when touched; they will simply fire their on-click listeners when pressed.

Any time a user hits a directional key or scrolls with a trackball, the device will exit touch mode, and find a view to take focus.
Now, the user may resume interacting with the user interface without touching the screen.

The touch mode state is maintained throughout the entire system (all windows and activities).
To query the current state, you can call isInTouchMode() to see whether the device is currently in touch mode.

Handling focus
The framework will handle routine focus movement in response to user input.
This includes changing the focus as Views are removed or hidden, or as new Views become available.
Views indicate their willingness to take focus through the isFocusable() method.
To change whether a View can take focus, call setFocusable().
When in touch mode, you may query whether a View allows focus with isFocusableInTouchMode().
You can change this with setFocusableInTouchMode().

On devices running Android 9 (API level 28) or higher, activities don't assign an initial focus.
Instead, you must explicitly request initial focus, if desired.

Focus movement is based on an algorithm which finds the nearest neighbor in a given direction.
In rare cases, the default algorithm may not match the intended behavior of the developer.
In these situations, you can provide explicit overrides with the following XML attributes in the layout file: nextFocusDown, nextFocusLeft, nextFocusRight, and nextFocusUp.
Add one of these attributes to the View from which the focus is leaving.
Define the value of the attribute to be the id of the View to which focus should be given.
For example:

<LinearLayout
    android:orientation="vertical"
    ...
>
  <Button android:id="@+id/top"
          android:nextFocusUp="@+id/bottom"
          ...
/>
  <Button android:id="@+id/bottom"
          android:nextFocusDown="@+id/top"
          ...
/>
</LinearLayout>

Ordinarily, in this vertical layout, navigating up from the first Button would not go anywhere, nor would navigating down from the second Button.
Now that the top Button has defined the bottom one as the nextFocusUp (and vice versa), the navigation focus will cycle from top-to-bottom and bottom-to-top.

If you'd like to declare a View as focusable in your UI (when it is traditionally not), add the android:focusable XML attribute to the View, in your layout declaration.
Set the value true.
You can also declare a View as focusable while in Touch Mode with android:focusableInTouchMode.

To request a particular View to take focus, call requestFocus().

To listen for focus events (be notified when a View receives or loses focus), use onFocusChange(), as discussed in the Event listeners section.

Android - Event Handling
Events are a useful way to collect data about a user's interaction with interactive components of Applications.
Like button presses or screen touch etc.
The Android framework maintains an event queue as first-in, first-out (FIFO) basis.
You can capture these events in your program and take appropriate action as per requirements.
There are following three concepts related to Android Event Management −
- Event Listeners − An event listener is an interface in the View class that contains a single callback method.
These methods will be called by the Android framework when the View to which the listener has been registered is triggered by user interaction with the item in the UI.
- Event Listeners Registration − Event Registration is the process by which an Event Handler gets registered with an Event Listener so that the handler is called when the Event Listener fires the event.
- Event Handlers − When an event happens and we have registered an event listener for the event, the event listener calls the Event Handlers, which is the method that actually handles the event.
Event Listeners & Event Handlers
| Event Handler |
Event Listener & Description |
| onClick() | OnClickListener()
This is called when the user either clicks or touches or focuses upon any widget like button, text, image etc.
You will use onClick() event handler to handle such event. |
| onLongClick() | OnLongClickListener()
This is called when the user either clicks or touches or focuses upon any widget like button, text, image etc.
for one or more seconds.
You will use onLongClick() event handler to handle such event. |
| onFocusChange() | OnFocusChangeListener()
This is called when the widget looses its focus ie. user goes away from the view item.
You will use onFocusChange() event handler to handle such event. |
| onKey() | OnFocusChangeListener()
This is called when the user is focused on the item and presses or releases a hardware key on the device.
You will use onKey() event handler to handle such event. |
| onTouch() | OnTouchListener()
This is called when the user presses the key, releases the key, or any movement gesture on the screen.
You will use onTouch() event handler to handle such event. |
| onMenuItemClick() | OnMenuItemClickListener()
This is called when the user selects a menu item.
You will use onMenuItemClick() event handler to handle such event. |
| onCreateContextMenu() | onCreateContextMenuItemListener()
This is called when the context menu is being built(as the result of a sustained "long click) |
There are many more event listeners available as a part of View class like OnHoverListener, OnDragListener etc which may be needed for your application.
So I recommend to refer official documentation for Android application development in case you are going to develop a sophisticated apps.
Event Listeners Registration
Event Registration is the process by which an Event Handler gets registered with an Event Listener so that the handler is called when the Event Listener fires the event.
Though there are several tricky ways to register your event listener for any event, but I'm going to list down only top 3 ways, out of which you can use any of them based on the situation.
- Using an Anonymous Inner Class
- Activity class implements the Listener interface.
- Using Layout file activity_main.xml to specify event handler directly.
Below section will provide you detailed examples on all the three scenarios −
Touch Mode
Users can interact with their devices by using hardware keys or buttons or touching the screen.Touching the screen puts the device into touch mode.
The user can then interact with it by touching the on-screen virtual buttons, images, etc.You can check if the device is in touch mode by calling the View class’s isInTouchMode() method.
Focus
A view or widget is usually highlighted or displays a flashing cursor when it’s in focus.
This indicates that it’s ready to accept input from the user.
- isFocusable() − it returns true or false
- isFocusableInTouchMode() − checks to see if the view is focusable in touch mode.
(A view may be focusable when using a hardware key but not when the device is in touch mode)
android:foucsUp="@=id/button_l"
onTouchEvent()
public boolean onTouchEvent(motionEvent event){
switch(event.getAction()){
case TOUCH_DOWN:
Toast.makeText(this,"you have clicked down Touch button",Toast.LENTH_LONG).show();
break();
case TOUCH_UP: Toast.makeText(this,"you have clicked up touch button",Toast.LENTH_LONG).show();
break;
case TOUCH_MOVE:
Toast.makeText(this,"you have clicked move touch button"Toast.LENTH_LONG).show();
break;
}
return super.onTouchEvent(event) ;
}
Share files with ES File Explorer
ES File Explorer, a powerful Android file manager.
ES File Explorer helps you manage the files on your local Android device.
Starting with version 3, however, LAN support was added to make it possible to share files with a Windows PC over Wi-Fi.
To share files between your Android device and a Windows PC using ES File Explorer, follow the steps below:Step 1: Create a shared folder on your Windows PC.
In our example, we'll name it, "Android PC share." Make sure the permissions are set for read/write access.Step 2: In ES File Explorer on your Android device, tap the globe icon in the upper-left hand corner, then navigate to Network > LAN.
![]() Step 3: On the menu at the bottom, tap "Search" to look for available network shares on your LAN.
If you don't see any, make sure that your Android device and the Windows computer are connected to the same local network and try again.
If successful, you should see your Windows computer listed with its IP address.
Step 3: On the menu at the bottom, tap "Search" to look for available network shares on your LAN.
If you don't see any, make sure that your Android device and the Windows computer are connected to the same local network and try again.
If successful, you should see your Windows computer listed with its IP address.
![]() Screenshot by Ed Rhee/CNET
Step 4: Tap on the icon for your Windows PC, then enter your Windows username and password.
Screenshot by Ed Rhee/CNET
Step 4: Tap on the icon for your Windows PC, then enter your Windows username and password.
![]() Screenshot by Ed Rhee/CNET
Step 5: After your shared folder appears, you can begin sharing files back and forth using ES File Explorer.
Screenshot by Ed Rhee/CNET
Step 5: After your shared folder appears, you can begin sharing files back and forth using ES File Explorer.
![]() Screenshot by Ed Rhee/CNET
ES File Explorer isn't the only way to share files over Wi-Fi, but it's a popular utility that you're likely to have on your Android device anyway, so you'd might as well give it a try.
Screenshot by Ed Rhee/CNET
ES File Explorer isn't the only way to share files over Wi-Fi, but it's a popular utility that you're likely to have on your Android device anyway, so you'd might as well give it a try.
note taking apps for Windows and android
https://keep.google.com/
google keep
run batch files in Android
In Linux(Android) it's called a script file, the one with the .sh extension (optional)
On non-rooted device you can run a script on SDcard with sh command:
adb shell sh path_to_script_on_sdcard/script.sh
without SU permission, just use sh command:
$ cd /sdcard
$ sh helloworld.sh
hello world
For a shell script you can setup Termux or Terminal Emulator in your phone, enable Storage permission for it, launch it and than run the script like this:
sh PATH_TO_FILE
Replace PATH with the path of file under /sdcard. It should work.
To run a compatible binary, move the file from sdcard into Termux's home using:
mv PATH_TO_FILE $HOME
Then verify and enable, using chmod +x $HOME/FILENAME if necessary, the executable permission on that moved file and run it.
You can run the dos batch file using an Android dosbox player. Download afreebox and then run the dos.
In there you can change the file exploring directory to the folder where the batch file is located. And type the batch file name with ending of .bat file.
安裝 Android Studio, Android TV 和 Google TV
安裝 Android Studio, Android TV 和 Google TV
Android TV
Transfer Files From Android to PC
1. Transfer Files From Android to PC With Bluetooth File Transfer
Is Bluetooth enabled on your PC? Perhaps you have a Bluetooth USB dongle, or your device has Bluetooth built in.
Either way, sending data via Bluetooth file transfer from Android to Windows is a good option, particularly for smaller files.
To begin, you'll need to enable Bluetooth, first on Windows, then Android.
To enable Bluetooth on Windows:
Press Win + I
In Settings, open the Devices > Bluetooth & other devices
Switch Bluetooth to On
Click Add Bluetooth or other device
Select Bluetooth again to scan for compatible devices
Meanwhile, enable Bluetooth on Android:
Swipe down from the top to open Quick settings
Long-tap Bluetooth
In the next screen, tap your PC’s name under Available devices
When prompted, confirm pairing (Pair on Android, Yes on Windows)
When pairing is complete, the computer will display a Device Ready notification.
For more details, see our guide to connecting your phone and PC using Bluetooth.
With a connection established, find the Bluetooth icon in the System Tray in the bottom-right corner of your desktop.
Right-click it and select Receive a file, then click Next to commence transfer.
Meanwhile, use your Android file browser or Gallery app to select the file you wish to transfer.
Use the Share button, select Bluetooth to share the data, and then pick your PC in the subsequent list.
Once the data has been transferred, you should receive notice that the file transfer has been completed successfully.
You'll be asked where to save it, so browse to your preferred destination and click Finish.
2. Share Files From Android to PC With AirDroid
AirDroid is a vital app for all Android users.
It's free with an optional premium subscription.
You'll need to create an account or sign in using Google, Facebook, or Twitter if you're pressed for time.
AirDroid offers notification and tethering tools as well as simple file transfer to a computer on the same Wi-Fi network.
You'll need to install this before proceeding.
Download: AirDroid (Free)
Once you've done that, head to the AirDroid download page, grab the desktop client, and install it.
Next, configure AirDroid for file sharing.
Open the AirDroid mobile app
When AirDroid requests permission to access and manage all files on your device, tap Continue and enable Allow access to manage all files.
Tap OK to view different Security & Remote Features.
To enable file transfer to a PC, open Security & Remote Features and check Files is set to On
If you're not prompted to sign in, select any one of the icons or menus to prompt for your details.
To transfer files from your mobile to a PC with AirDroid:
Ensure both PC and phone are connected to the same network
In the AirDroid Transfer tab, select your PC name
Tap the paperclip icon to browse for data to transfer
With the file(s) selected, tap Send
Need to make a mobile to PC file transfer with Android? Simply drag and drop the file from your desktop into the AirDroid client.
3. How to Share Files From Mobile to PC With Pushbullet
Like AirDroid, Pushbullet syncs data and notifications between your phone and PC.
In short, if you don't fancy AirDroid, or can't get it to work, Pushbullet is your best alternative.
Begin by installing the Pushbullet Android app.
When installing, you'll have to sign in via Google first and follow the follow-up prompts to proceed.
Next, you need to agree to let the app access your media files.
Click Allow if you're okay with this, then head to Pushbullet's website.
You can sign in to the web client or download the dedicated Windows app.
To send a file to your PC:
Select Pushing in the bottom navigation bar
Tap the paperclip icon.
Choose Send file
Select the file to share
Hit Send button to finish
A moment later, the image will appear in the web client on your desktop next to the name of the sending device.
To save the transferred file, tap the file or image name, and it will be downloaded instantly.
If you face some issues with an Android to PC file transfer, use Pushbullet's Remote Files feature.
Follow these steps:
On the Pushbullet mobile app, tap Account > Remote Files and enable Remote File access.
On PC, click Remote File access, and select your Android device.
This will show you all the different files and folders on your Android phone.
Select the file you want to transfer and click Request.
The file will be shared almost instantly if you're connected to the same network.
You'll see the file appear under Devices > Your Android Device.
Tap the shared file to download.
4. Share Files From Mobile to PC With a USB Cable
Equipped with just your phone and PC? If you have a compatible USB data cable handy, (it's preferable to use the original to avoid issues), this is the fastest Android to PC file transfer option.
To use this method on older Android devices:
Connect the USB cable to your PC and your phone
On Android, look for the Allow access notification
Tap Allow to proceed
Drag the notification shade down and find USB file transfer turned on
Tap to expand the full preferences
Confirm File transfer is selected
On newer versions of Android, once you connect your PC and Android phone:
Wait for the Use USB for pop-up
Tap File transfer
If the pop-up doesn’t appear, swipe down and tap Android system > File transfer
Following this, respond to your PC.
In the Windows notification, select View Device and Open Files.
Your PC will then automatically open a folder view of your Android device storage.
If it doesn't, open File Explorer and look for your Android device in This PC.
You can identify it by its model name.
When connected, you'll be able to browse the phone's contents and copy data to your PC.
Note that if you're connecting these devices for the first time, Windows will attempt to install the relevant drivers first.
Your phone may also install an Android file manager for your PC via USB to open whenever the phone connects.
If you have trouble with this, see our guide on how to fix an Android phone that won't connect to a computer.
5. Transfer Files From Android to PC Using an SD Card
Another basic method that doesn't bother with apps or wireless networking protocols is to copy data to your phone's microSD card.
This is a particularly useful option if you don't have a USB cable and want to keep it simple.
You will need a microSD to SD card adapter and a card reader, however.
Simply save the files to your phone's SD card, then shut down the device.
Eject the card, then insert it in your PC's card reader to view the data.
If your phone doesn't have a microSD card slot, most modern Android devices support USB OTG.
Simply connect your USB SD card reader to your phone using a USB OTG adapter.
6. How to Share Files Over Cloud Storage
With cloud services such as Dropbox and Google Drive, you might have already transferred data to your computer without knowing it.
For example, Dropbox and Google Drive both offer automatic camera upload.
If you have the cloud service client installed on your computer, photos will automatically sync to your PC.
Similar features are available with other cloud services.
You can copy any data to the cloud folder on your Android device and sync it to Windows.
7. Transfer Small Files Using Email
Email was the first extensively used method of non-disk data transfer between devices and remains a useful option for many.
All you need to do is attach the data to an email on your phone and send it to yourself.
ACCESS PHONE FILES FROM YOUR COMPUTER
Step 1: On Windows PC, you need to go to Control Panel < Programs and Features. Select Turn Windows features on or off from the list, and make sure that SMB1.0/CIFS File Sharing Support is Checked
Step 2: Enable Network discovery and File Sharing on PC.
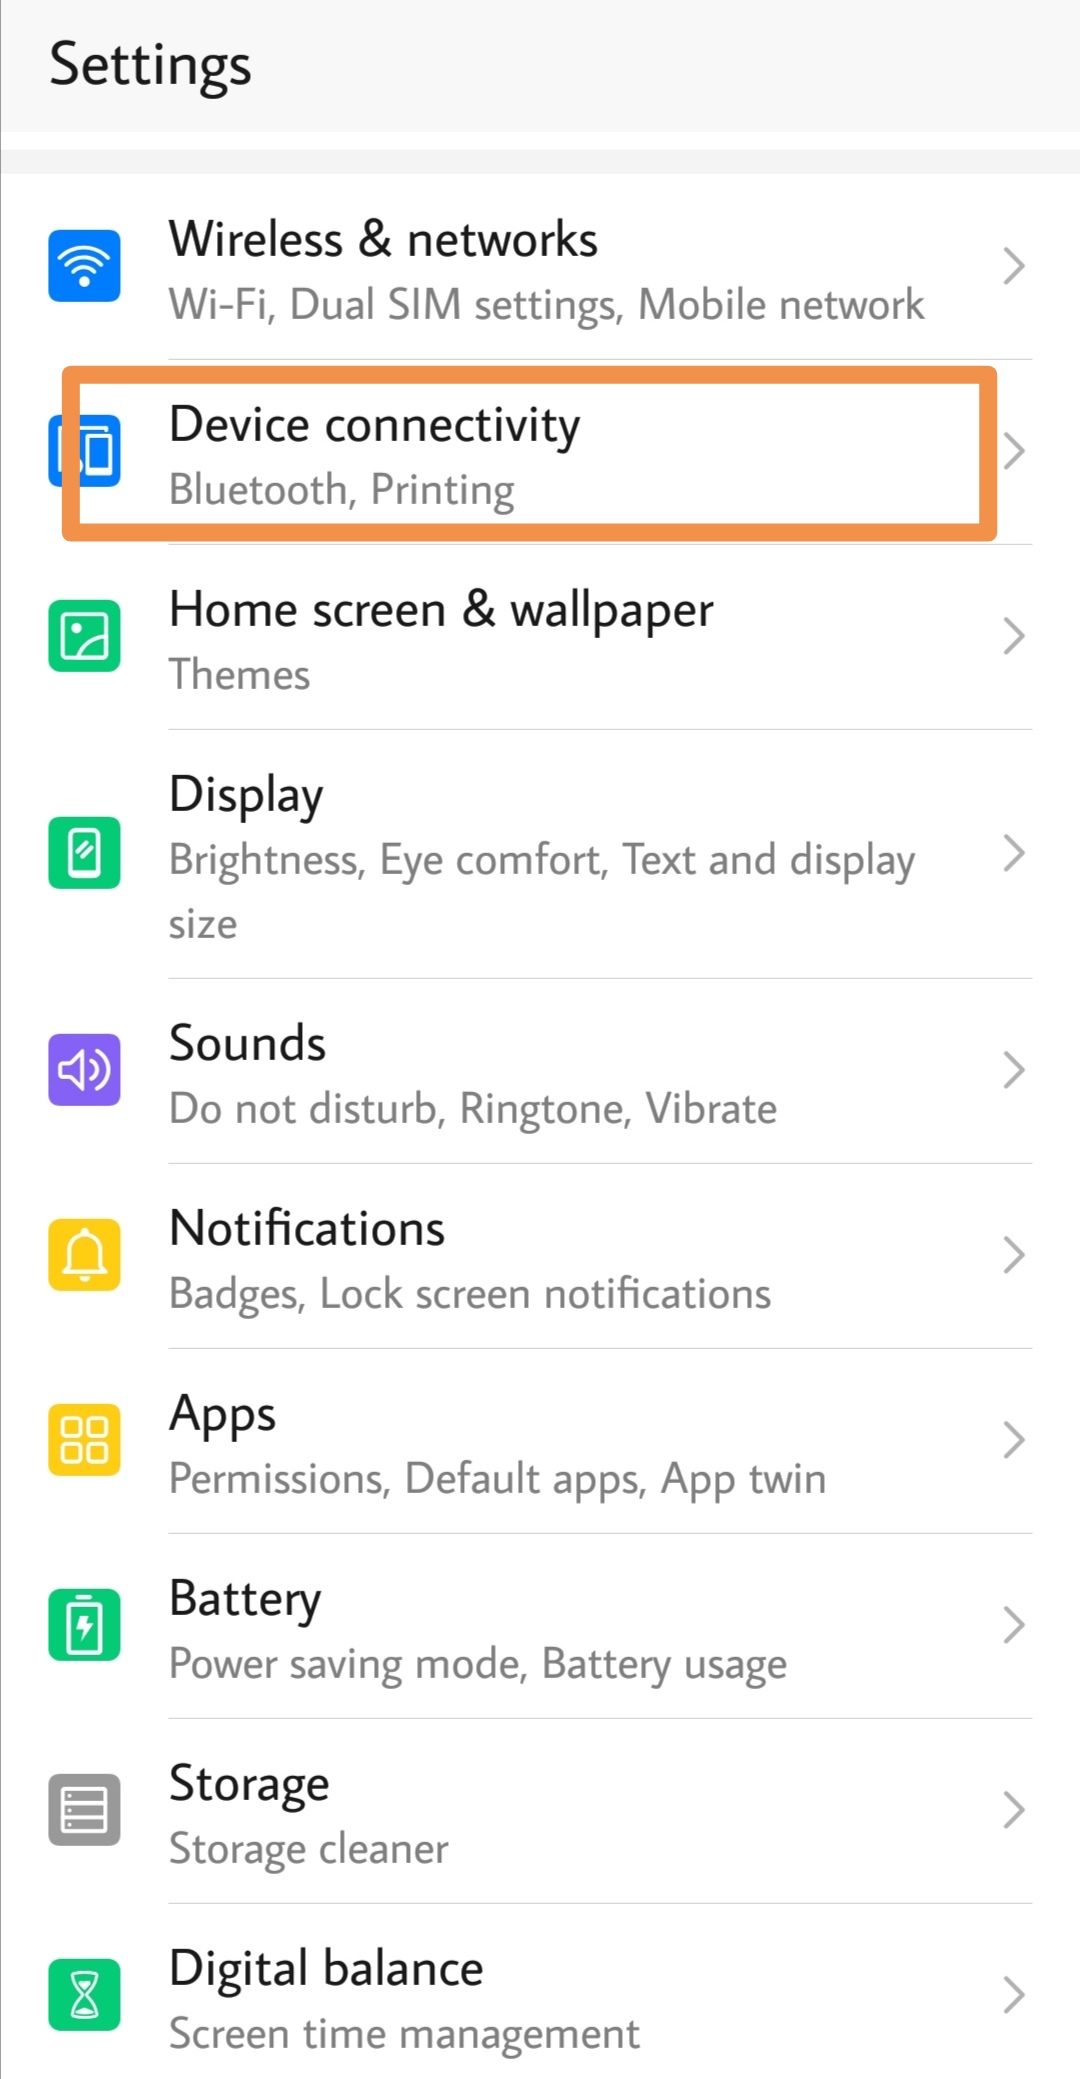
Step 3: Next, go to Huawei/Honor mobile Settings and tap on Device connection.
![]() Step 4: Here, you will find the Huawei Share settings. Simply, tap on it and toggle-on the ‘Huawei Share' and ‘Computer share' option.
Step 4: Here, you will find the Huawei Share settings. Simply, tap on it and toggle-on the ‘Huawei Share' and ‘Computer share' option.
![]()
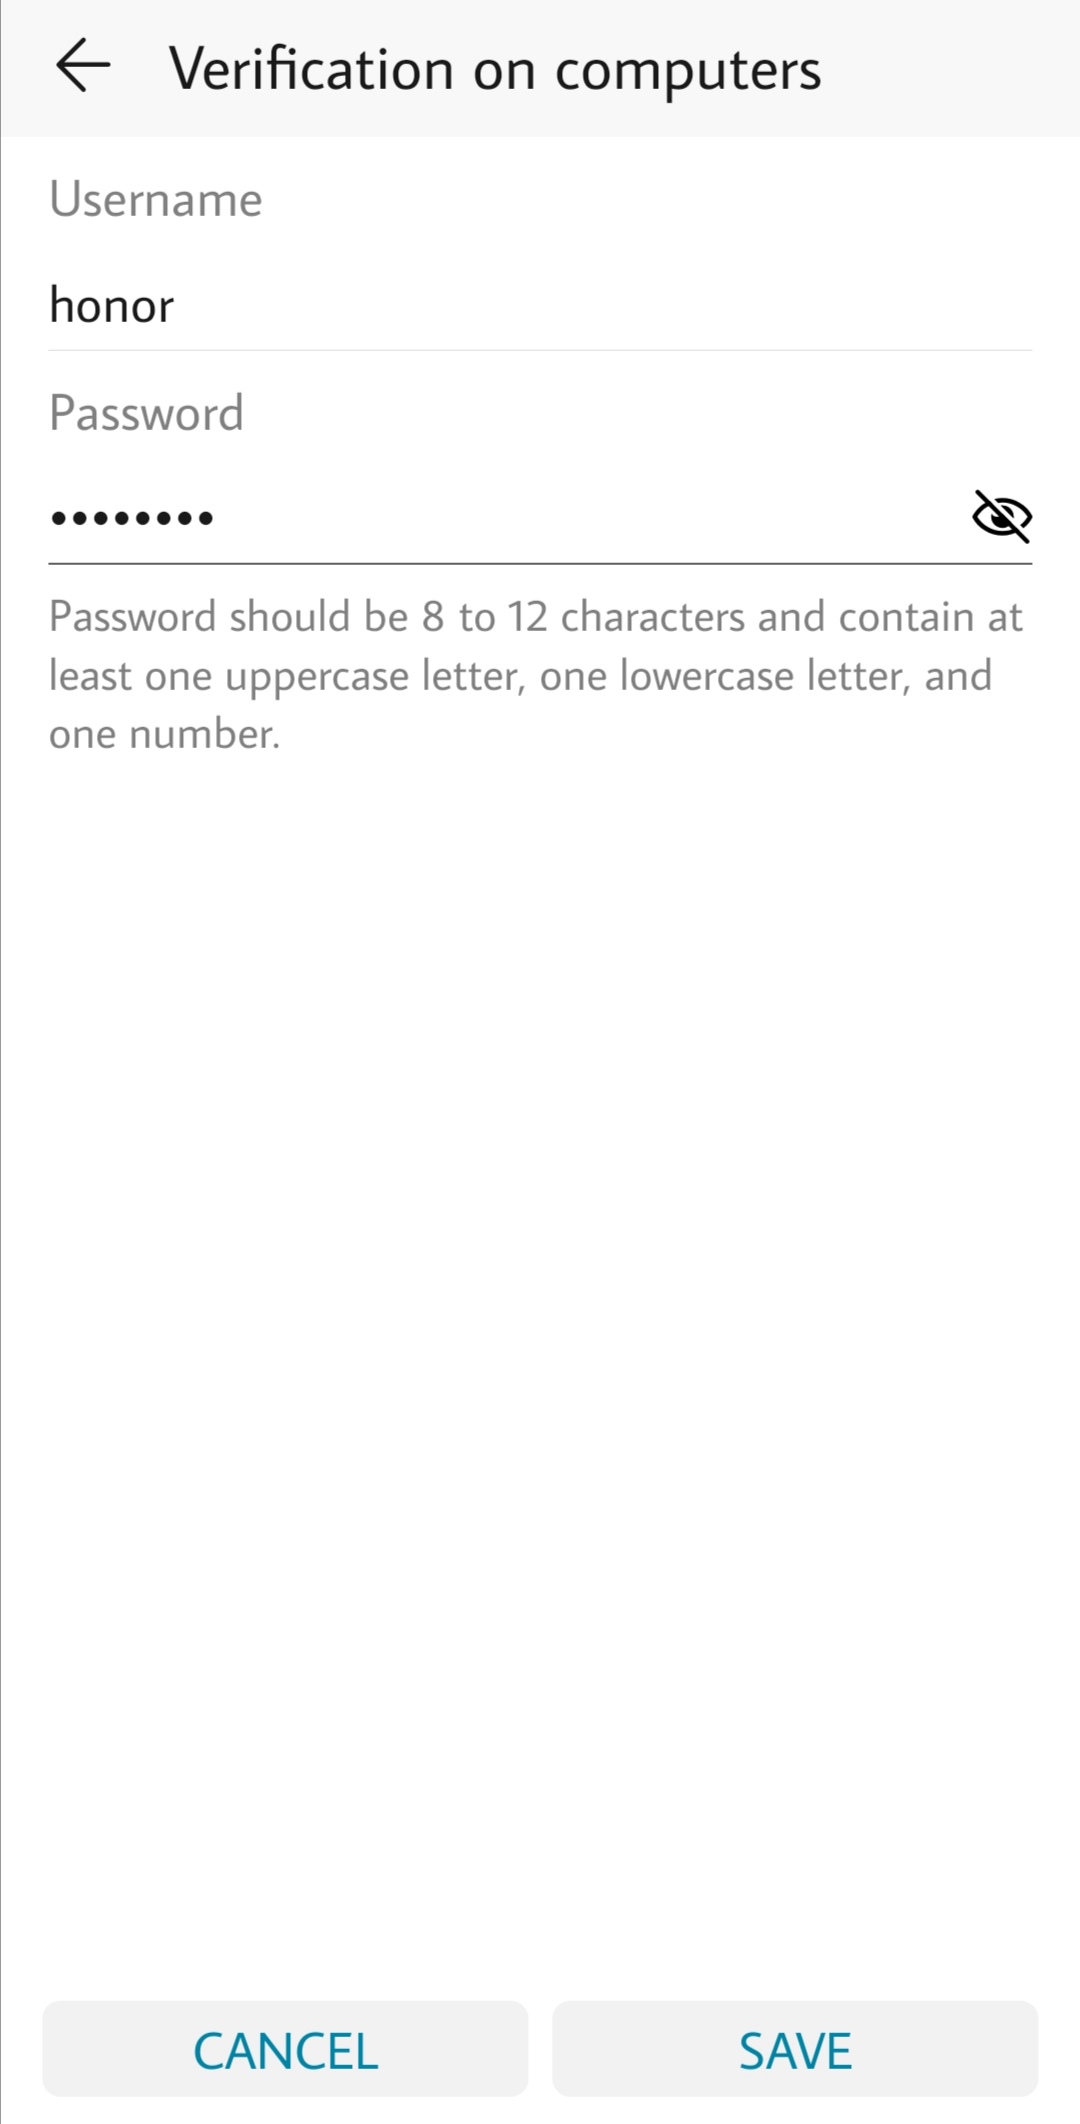
![]() Step 5: Once enabled, set up a Username & Password.
Step 5: Once enabled, set up a Username & Password.
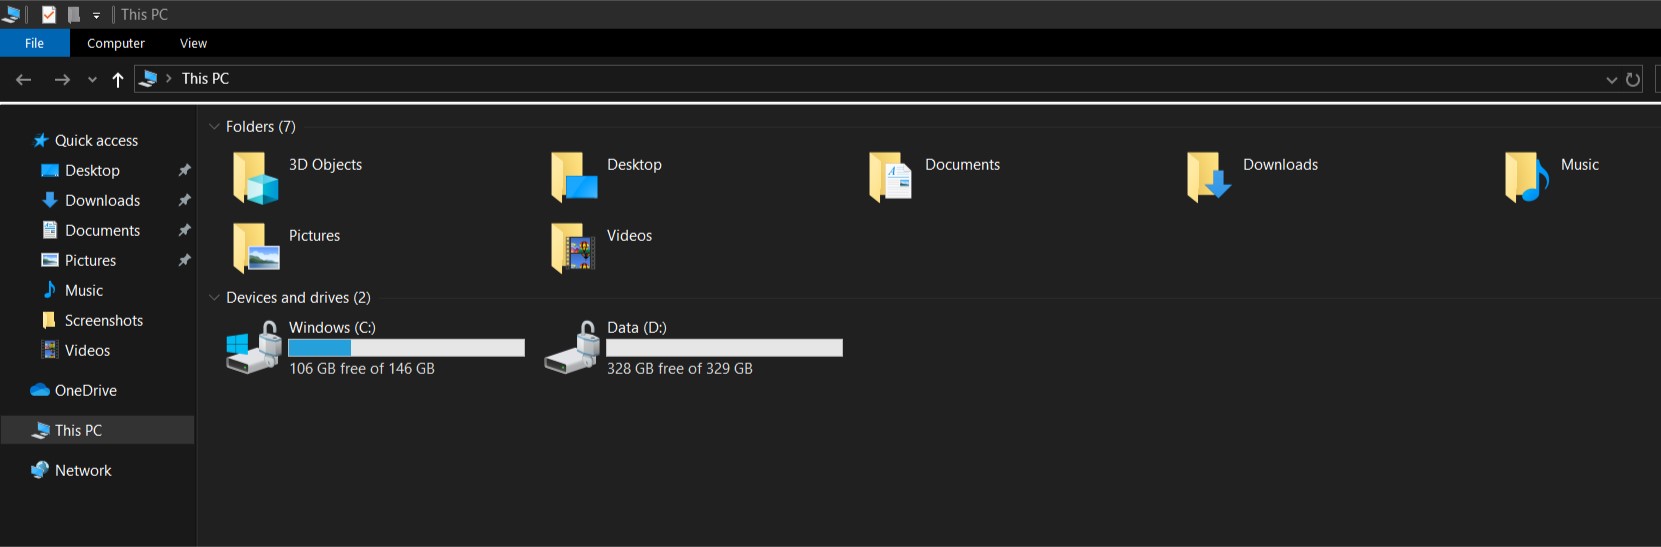
![]() Step 6: Make sure both the Huawei phone and Windows PC are connected to the same Wi-Fi network.
Step 7: Go to Network on ‘My PC' and select the device.
Step 6: Make sure both the Huawei phone and Windows PC are connected to the same Wi-Fi network.
Step 7: Go to Network on ‘My PC' and select the device.
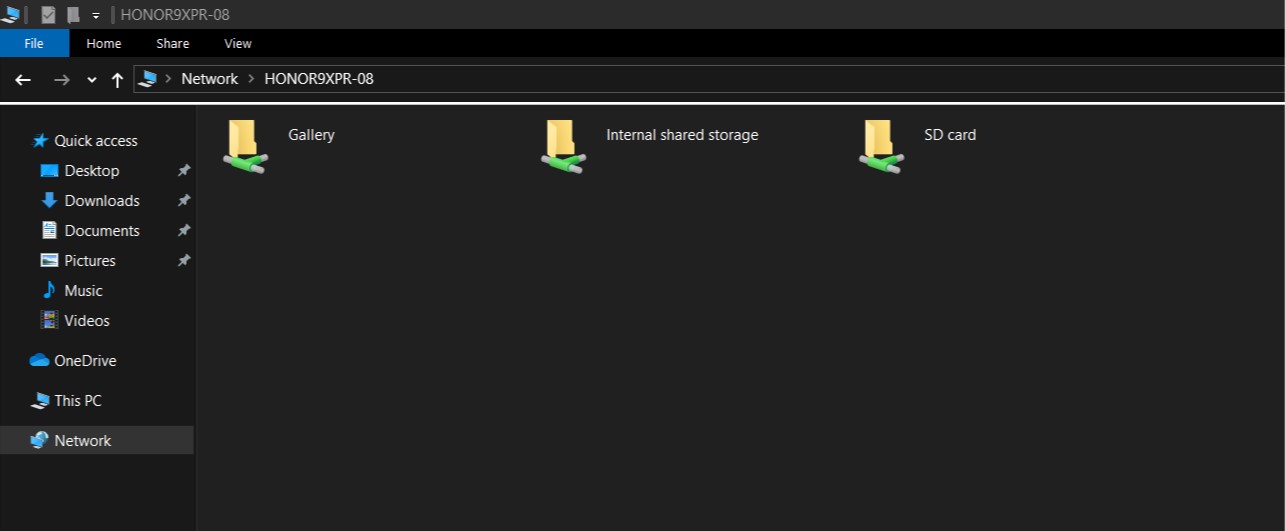
![]() Step 8: Now go to Network and connect to your Smartphone by clicking the Name and the Password.
Step 8: Now go to Network and connect to your Smartphone by clicking the Name and the Password.
![]() That's it! You're all set to transfer files between your phone and PC.
You can acess photos in Gallery, Information from SD Card & Internal Storage directly from your PC.
That's it! You're all set to transfer files between your phone and PC.
You can acess photos in Gallery, Information from SD Card & Internal Storage directly from your PC.
Android服务器集成应用KSWeb
它类似于Windows平台下的WAMP软件。
KSWeb可以在不强制要求您获取root权限的前提下,我们可以在Android上搭建一个完整的开发WEB运行环境,,这对PHP和网页开发非常重要。
你需要一部闲置的可以正常使用可以连接网络的安卓手机下载并安装ksweb,打开软件等待加载程序,然后重启ksweb。
获取ROOT权限后可开启80端口访问无任何限制。
在“选项”里可以设置更多选项。
调试时可以使用浏览器访问。
首先通过FileZilla将web应用文件上传到htdocs目录下。
KSWeb是一个简单易用的安卓手机服务器管理软件,它是支持apache,nginx,ftp等多种开源安卓服务器,并且它的下载速度超快,安装运行方便。
如果你是WBE开发新手,如果你手上有闲置的安卓手机,非常值得尝试一下它。
通过使用KSWEB我们可以最大化的利用闲置资源,有了它,你可以把所有的外链都放到手机里,这样既不会担心某一天外链挂掉,也可以让外链的音乐,视频,图片完全瞬间打开,没有任何流量限制。
android web server
AWebServer Http Web Server Apache PHP Sql
Android PHP WEB Server
apache mysql php on android
Android Web Server
Run Web Server On Android Install PHP MySQL On Mobile
KSWEB
DroidEdit
droidedit
闲置安卓手机充当软路由
闲置安卓手机充当软路由,突破第三方VPN限制
Installing R on Android
Installing R on Android
run a script on non-rooted Android device
run a script on non-rooted Android device
Android手机改为服务器
工具介绍
目前能用的工具有很多,比如BusyBox、Linux Deploy、juice ssh、termux,但是很多都是需要手机能够root的,但是root并不是所有手机都能够简单获取到的,所以我这里选取Termux进行操作。
什么是Termux
Termux 是一款运行于 Android 系统的开源终端模拟器。
提供了 Linux 环境,即使设备不具备 root 权限也可使用。
通过自带的包管理器(Pacman、 APT),Termux 可以安装许多现代化的开发和系统维护工具,例如 zsh、Python、Ruby、NodeJS、MySQL 等软件。
开始改造
4.1 Termux安装
Termux下载:https://github.com/termux/termux-app/releases/tag/v0.118.1
 安装完成后,可以执行以下命令更新一下各软件包:
pkg update && pkg upgrade
安装完成后,可以执行以下命令更新一下各软件包:
pkg update && pkg upgrade

4.2 安装openSSH
成功安装Termux之后,虽然手机是可以像服务器一样执行一些操作,但是毕竟手机管理配置起来没有PC方便,所以可以安装SSH服务,方便PC来远程操作。
# 安装openssh
pkg install openssh
# 默认端口为8022,修改端口
sshd -p 8888
# 启动ssh服务
sshd

4.3 远程连接SSH
要远程连接可以使用终端或者SSH客户端(如:PuTTY、Termius、XShell、MobaXterm等),使用以下命令连接到Termux服务。
ssh -p 8022 <username>@<device_ip>
username
在Android手机上使用Termux搭建服务器,并通过SSH让PC进行登录和操作时,**默认的用户名通常是u0_aXXX,**可以通过以下方式获取到你的用户名是什么:
# 查询termux服务用户名
whoami
device_ip
通过以下命令获取手机的IP,这里的IP是局域网IP。
# 获取设备IP
ifconfig wlan0
连接时需要密码,由于termux服务默认密码为空,所以需要设置一个密码,具体方式如下:
# 切换管理员账户(如果有)
su
# 设置密码
passwd

注意点
5.1 保持服务在线
由于Termux是直接运行到Android手机上的,也是一个APP程序,所以需要注意Termux程序不要退出了。
5.2 内网服务
虽然经过上述方式已经实现了服务器的常规基础配置和操作功能,但是毕竟是在手机上的一个服务,也是受到网络环境限制的,因此如果要保证服务可用,需要保证手机和使用端在同意局域网内。
Huawei How to disable developer options
Open the Settings
Tap on System & updates
Tap on Developer options
Disable the Developer options
WeChat「影音號」影片的下載方法
1. 透過錄製螢幕下載影片
這是一種簡單且有效的方法,你只需要透過錄制螢幕來下載影片。
這種方法無需第三方應用,操作便捷,適合各種用戶。
具體步驟如下:
從螢幕右上角向下滑動,找到並點選灰色的「錄製」按鈕。
 在3秒鐘的倒數計期間,退出「控制中心」,開始錄製螢幕。
若要停止錄製,點選螢幕頂端的「螢幕錄影」按鈕,然後點選「停止」按鈕。
在3秒鐘的倒數計期間,退出「控制中心」,開始錄製螢幕。
若要停止錄製,點選螢幕頂端的「螢幕錄影」按鈕,然後點選「停止」按鈕。
 或:開啟「控制中心」,然後點選紅色的「錄製」按鈕。

2. 透過手機「檔案管理器」下載WeChat影片
使用手機的「檔案管理器」可以直接訪問WeChat的資料目錄。
找到存放影片的資料夾,將需要的影片複製或移動到其他位置即可。
這種方法適合對手機操作較為熟悉的用戶。
具體操作如下:
確保微信有儲存訪問許可權:開啟手機「設定」,選擇「應用和服務」,點選「應用管理」,找到並進入微信,選擇「許可權」,勾選「儲存」下的「允許」。
 查詢並播放影片:開啟微信,點選「發現」,選擇「影片號」,播放想要儲存的影片直到結束。
 訪問檔案管理器:開啟手機的「檔案管理」,依次開啟路徑:「Android-> data-> com.tencent.mm-> cache-> 長串代號資料夾-> finder-> video」,按時間查詢最新的影片檔案。
 儲存影片:找到最新的影片檔案後,修改其字尾名為.mp4。
這樣,影片就儲存並可以播放了。
儲存影片:找到最新的影片檔案後,修改其字尾名為.mp4。
這樣,影片就儲存並可以播放了。

 Step 3: On the menu at the bottom, tap "Search" to look for available network shares on your LAN.
If you don't see any, make sure that your Android device and the Windows computer are connected to the same local network and try again.
If successful, you should see your Windows computer listed with its IP address.
Step 3: On the menu at the bottom, tap "Search" to look for available network shares on your LAN.
If you don't see any, make sure that your Android device and the Windows computer are connected to the same local network and try again.
If successful, you should see your Windows computer listed with its IP address.
 Screenshot by Ed Rhee/CNET
Step 4: Tap on the icon for your Windows PC, then enter your Windows username and password.
Screenshot by Ed Rhee/CNET
Step 4: Tap on the icon for your Windows PC, then enter your Windows username and password.
 Screenshot by Ed Rhee/CNET
Step 5: After your shared folder appears, you can begin sharing files back and forth using ES File Explorer.
Screenshot by Ed Rhee/CNET
Step 5: After your shared folder appears, you can begin sharing files back and forth using ES File Explorer.
 Screenshot by Ed Rhee/CNET
ES File Explorer isn't the only way to share files over Wi-Fi, but it's a popular utility that you're likely to have on your Android device anyway, so you'd might as well give it a try.
Screenshot by Ed Rhee/CNET
ES File Explorer isn't the only way to share files over Wi-Fi, but it's a popular utility that you're likely to have on your Android device anyway, so you'd might as well give it a try.
 Step 4: Here, you will find the Huawei Share settings. Simply, tap on it and toggle-on the ‘Huawei Share' and ‘Computer share' option.

 Step 5: Once enabled, set up a Username & Password.
 Step 6: Make sure both the Huawei phone and Windows PC are connected to the same Wi-Fi network.
Step 7: Go to Network on ‘My PC' and select the device.
Step 6: Make sure both the Huawei phone and Windows PC are connected to the same Wi-Fi network.
Step 7: Go to Network on ‘My PC' and select the device.
 Step 8: Now go to Network and connect to your Smartphone by clicking the Name and the Password.
 That's it! You're all set to transfer files between your phone and PC.
You can acess photos in Gallery, Information from SD Card & Internal Storage directly from your PC.
That's it! You're all set to transfer files between your phone and PC.
You can acess photos in Gallery, Information from SD Card & Internal Storage directly from your PC.